Holden Cascada (CJ; 2015 – 2017) – fuse and relay box diagram
Year of production: 2015, 2016, 2017
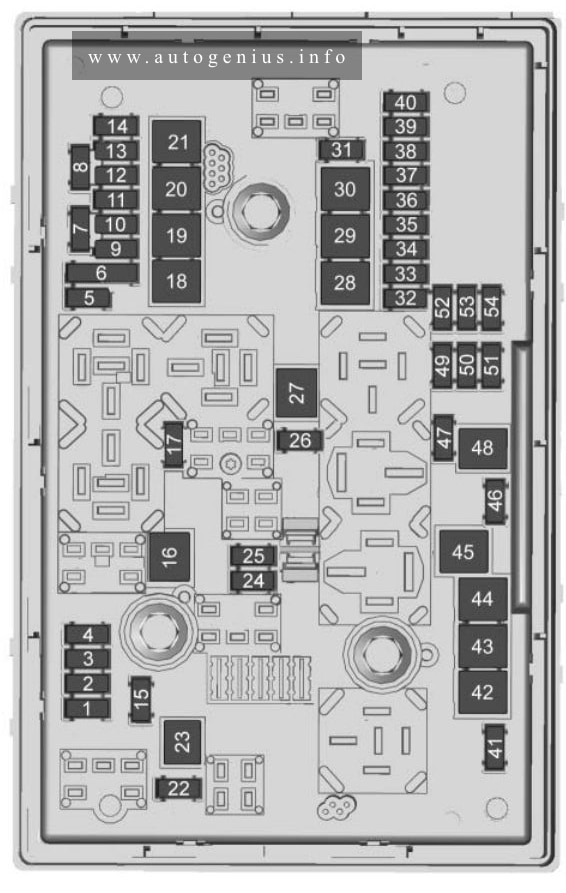
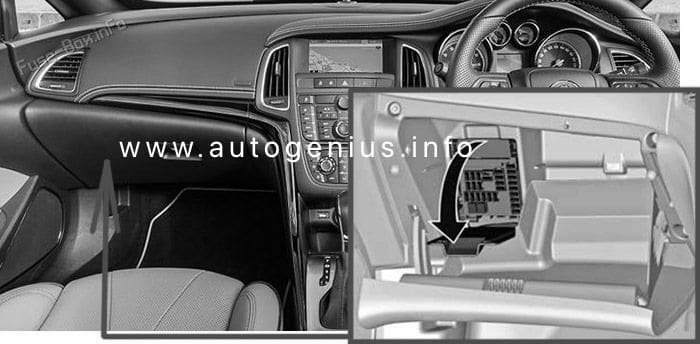
Passenger Compartment Fuse Box
Fuse Box Location
The fuse box is located behind a cover in the glovebox. Open the glovebox, then open the cover and fold it down.
Fuse Box Diagram
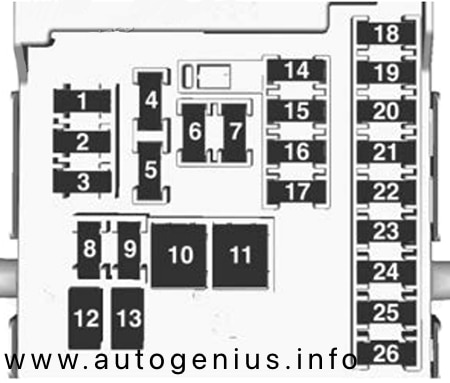
Assignment of the fuses in the passenger compartment
| № | Circuit |
|---|---|
| 1 | Displays |
| 2 | Body control unit / Exterior lights |
| 3 | Body control unit / Exterior lights |
| 4 | Infotainment system |
| 5 | Infotainment system / lnstrument |
| 6 | Power outlet / Cigarette lighter |
| 7 | Power outlet |
| 8 | Body control module / Left low beam |
| 9 | Body control module / Right low beam |
| 10 | Body control module / Door locks |
| 11 | Interior fan |
| 12 | Driver power seat |
| 13 | Passenger power seat |
| 14 | Diagnostic connector |
| 15 | Airbag |
| 16 | Boot lid relay |
| 17 | Air conditioning system |
| 18 | Service diagnose |
| 19 | Body control module / Brake lights / Tail lights / lnterior lights |
| 20 | – |
| 21 | Instrument panel |
| 22 | Ignition system |
| 23 | Body control module |
| 24 | Body control module |
| 25 | – |
| 26 | Trunk power outlet accessory |
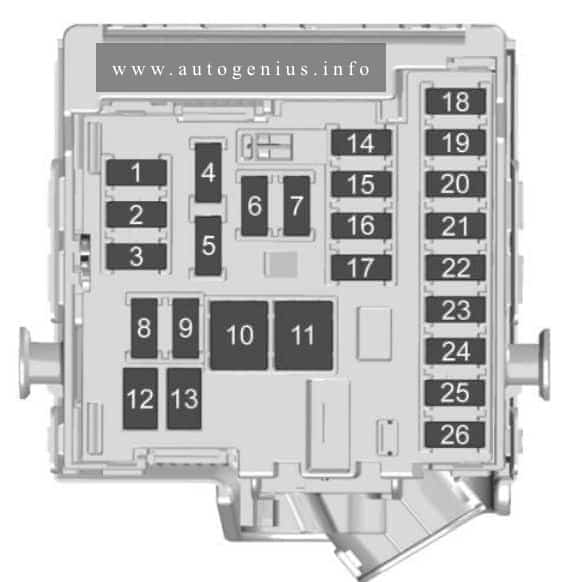
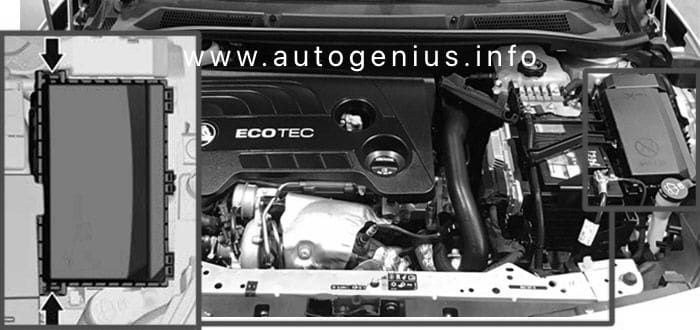
Engine Compartment Fuse Box
Fuse Box Location
Disengage the cover and fold it upwards until it stops. Remove the cover vertically upwards.
Fuse Box Diagram
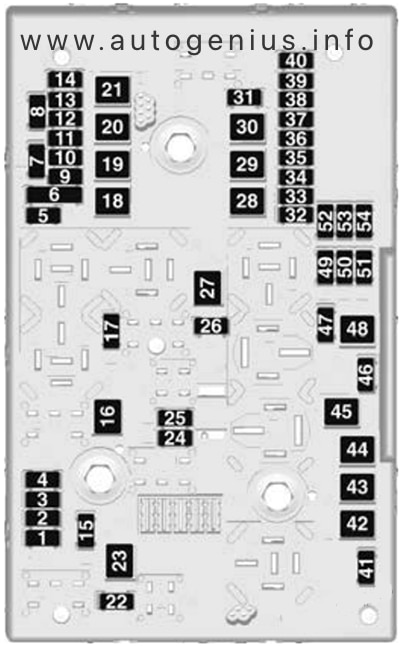
Assignment of the fuses in the engine compartment
| № | Circuit |
|---|---|
| 1 | Engine control module |
| 2 | Lambda sensor |
| 3 | Fuel injection / lgnition system |
| 4 | Fuel injection / lgnition system |
| 5 | – |
| 6 | Mirror heating |
| 7 | Fan control |
| 8 | Lambda sensor / Engine cooling |
| 9 | Rear window sensor |
| 10 | Vehicle battery sensor |
| 11 | Trunk release |
| 12 | Adaptive forward lighting / Automatic light control |
| 13 | ABS Valves |
| 14 | – |
| 15 | Engine control module |
| 16 | Starter |
| 17 | Transmission control module |
| 18 | Heated rear window |
| 19 | Front power windows |
| 20 | Rear power windows |
| 21 | Rear eletrical centre |
| 22 | Left high beam (Halogen) |
| 23 | Headlamp washer system |
| 24 | Right low beam (Xenon) |
| 25 | Left low beam (Xenon) |
| 26 | Front fog lights |
| 27 | – |
| 28 | Start stop system |
| 29 | Electric parking brake |
| 30 | ABS pump |
| 31 | – |
| 32 | Airbag |
| 33 | Adaptive forward lighting / Automatic light control |
| 34 | Exhaust gas recirculation |
| 35 | Power windows / Rain sensor / Exterior mirror |
| 36 | Climate control |
| 37 | – |
| 38 | Vacuum pump |
| 39 | Fuel system control module |
| 40 | Windscreen washer system |
| 41 | Right high beam (Halogen) |
| 42 | Radiator fan |
| 43 | Windscreen wiper |
| 44 | – |
| 45 | Radiator fan |
| 46 | – |
| 47 | Horn |
| 48 | Radiator fan |
| 49 | Fuel pump |
| 50 | Headlamp levelling / Adaptive forward lighting |
| 51 | – |
| 52 | – |
| 53 | Transmission control module / Engine control module |
| 54 | Vacuum pump / lnstrument panel cluster / Heating ventilation / Air conditioning system |
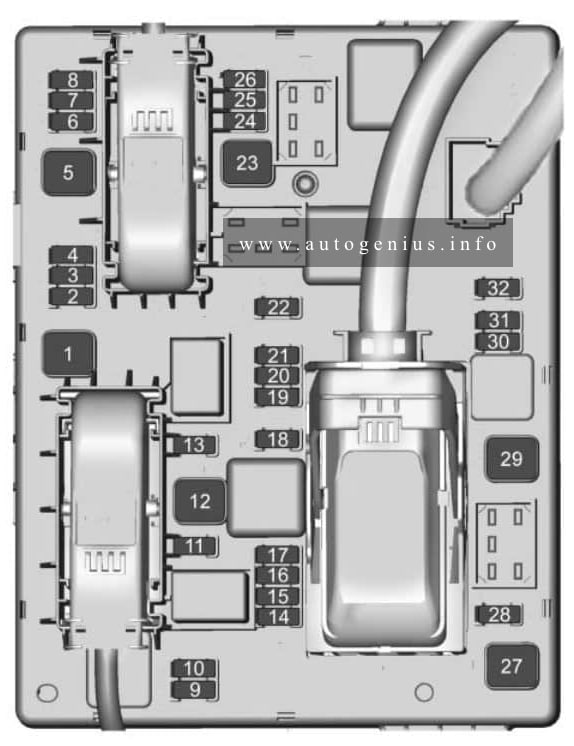
Load Compartment Fuse Box
Fuse Box Location
The fuse box is on the left side of the load compartment behind a cover.
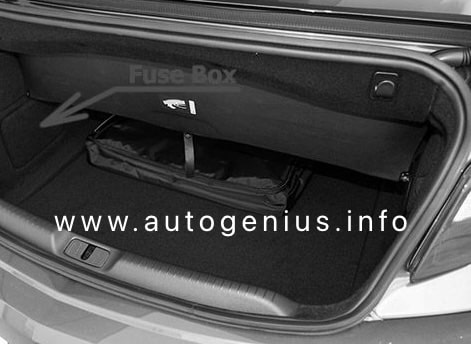
Fuse Box Diagram
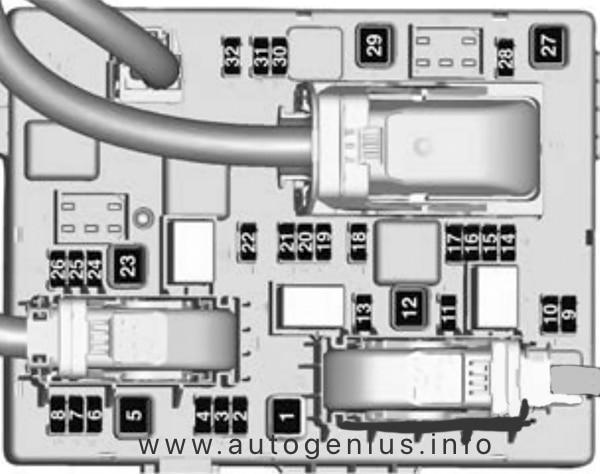
Assignment of the fuses in the load compartment
| № | Circuit |
|---|---|
| 1 | Soft top control module / Power rail right |
| 2 | – |
| 3 | Parking assist |
| 4 | – |
| 5 | – |
| 6 | – |
| 7 | Power seat |
| 8 | Soft top control module |
| 9 | – |
| 10 | – |
| 11 | Trailer module / Tyre pressure monitor and rear view camera |
| 12 | Soft top control module / Tail lights |
| 13 | – |
| 14 | Rear seat electrical folding |
| 15 | – |
| 16 | Seat ventilation / Rear view camera / Soft top control module |
| 17 | – |
| 18 | – |
| 19 | Steering wheel heating |
| 20 | – |
| 21 | Seat heating |
| 22 | – |
| 23 | Soft top control module / Power rail left |
| 24 | – |
| 25 | – |
| 26 | Jumper fuse for non logistic mode |
| 27 | Passive entry |
| 28 | – |
| 29 | Hydraulic unit |
| 30 | – |
| 31 | – |
| 32 | Flex Ride |
WARNING: Terminal and harness assignments for individual connectors will vary depending on vehicle equipment level, model, and market.